


Note: I recently got Lightroom which I LOVE for organizing photos, but I don't do a ton of editing there. Just small basic adjustments if needed. Most of my editing is done in Photoshop CS5.
And now for the questions! :-)
1. How do you do your clean edits?
Here's an example using a photo of TT from the Capitol. I was so smitten with her little grin that I didn't notice the focus on her eyes was not perfect. Oh well! :-) And, I'm actually showing you a different edit than I originally posted. I decided my first edit was a bit warm. I always save my SOOC shots; sometimes I change my mind in how I like them edited. Here's my SOOC:

And here is my clean edit: (only edited in CS5, not Lightroom)
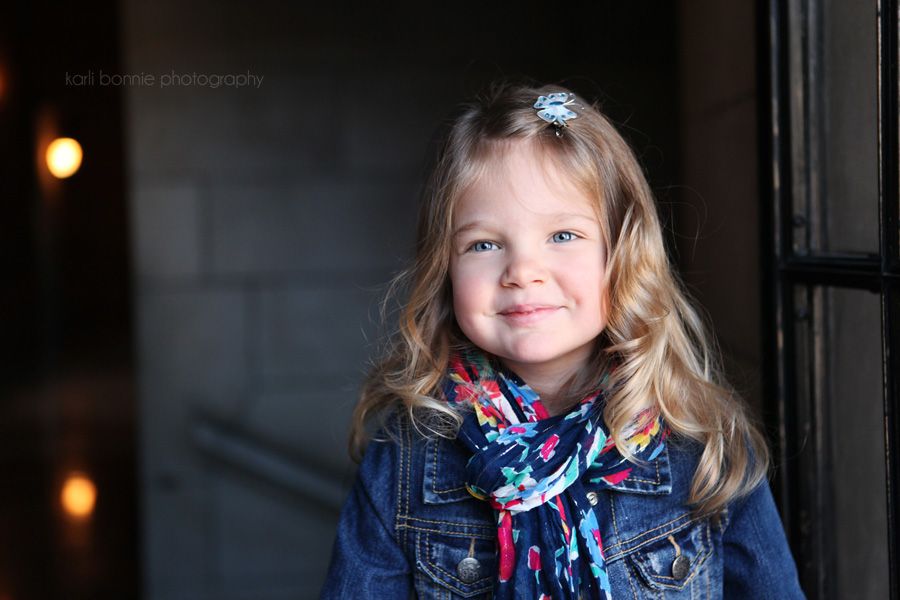
Doesn't look much different? That's the point. :-) I'm using bit lighter hand in editing these days. I like a more natural look. What I did:
a. Cropped (I don't love my crop because I lost a bit of the windows on the right side, but there was a bit too much head room in the SOOC).
b. Used the spot tool in CS5 to remove a bit of rough skin on Livia's cheeks.
c. Used Coffeeshop's free Baby PowderRoom action to smooth her cheeks very slightly.
d. Duplicated my background and set it to 20% soft light. (Don't have Photoshop and the soft light blending mode? Try increasing your contrast a bit, (+10 to +20) and it will give you a similar effect).
e. Resized and resharpened for web (which I explain below).
If you expose your shot correctly and get your white balance right, there's really not much to do to clean up your photo unless you're going for an artistic edit. AND it's huge time saver! :-)
2. Do you use an action for your hazy black and white photos?
Yes. Here's a free action I use frequently.
Hazy B&W. (The action comes with a Sharpen layer. I always turn it off).

3. Do you use a lot of actions?
Not anymore. I have tons of actions, and I mean TONS. Ridiculous amounts of money spent on actions. But I will say this, buying these actions were instrumental in teaching me my way around Photoshop. Instead of "using" the actions, a lot of times I would just let them run and then examine what was actually happening in each step. I like to know what's going on behind the scenes. With that being said, I'll share with you what actions I most commonly use when I do use actions.
(Except for the 1st one which is harder to find, please forgive that I didn't link the rest of these up. I might come back and do it when I have a bit more time. But if you google them, they're very easy to find).
1. Aly's Color (It's the 9th one on the list). I don't use this action as much as I used to. Now I do a similar tweak on my own in Lightroom if needed. I used to run this on 100% of my photos. I felt like it "cleaned" them up, and I just couldn't process a photo without it. It was my most used action for two years. This action is free.
2. Florabella's 'Vintage Spring' (from Spring Set 1) Pretty much the only action I use from this set. Once in a while I will use 'Blossom.'
3. LilyBlue's 'Simple 3' (from the Simple Set) It is the only action I use from this set.
4. Pioneer Woman's warmer action (I use custom white balance settings on my camera: daylight, shade, cloudy... but sometimes I like a little extra warmth). This action is also free.
5. Kellie Hatcher's 'Alfonso' preset (from her color preset collection for Lightroom) These presets are very strong on my photos, so I always reduce the opacity. Alfonso is pretty much the only one I use.
6. For resizing and resharpening for the web, I use MCP's 'Brand-it' action from the Finish-it Set. It puts my watermark on automatically, and resizes to 900px, the size I use for my blog. The sharpening part defaults to 61%, and I usually tone it down to 5-10% for portraits. Maybe 30% for other things, flowers, buildings, etc.
4. Do you shoot RAW or jpeg?
jpeg
5. (This was not asked), but here's something else I like to do to my photos: In several of the Florabella action sets, there is an action called 'Center Fill Light' and 'Vignette.' My latest thing is to add a bit of center fill light to my photos. It draws your eyes in and makes the center of the photo look less heavy. It's not something you could look at my photos and point out. But if you turn the layer on and off, you'll see a slight difference. I also love a hint of a vignette - around 8% or so. Haven't noticed a black ring around my photos? ;-) That's right... I do it at such a low opacity, your eyes aren't drawn to it. But again, when you turn the vignette layer off and on you definitely see the difference. Just something else to draw your eye in, and away from the edges of the photo.
6. How do you add that hazy look to your photos?
There are several ways to add haze. One is to go into Levels and increase the 'output level.' See below:

WOA that was small. Look right where the red arrow is pointing. I scooted that little black triangle to the right a bit. Normally it would be lined up along the left side.
Another more FUN way to add haze is to add a fill layer of color (light pink, soft yellow, lavender)... and set the layer to 'Screen' blending mode. In Photoshop you'd go to Layer - New Fill Layer - Solid Color. Choose white, off white or a nice pastel color, set that layer to 'Screen' and turn the opacity WAY down. A fun way to add soft, colored haze to your photos!
7. How did you meter that 4th picture of Livia in the Capitol?
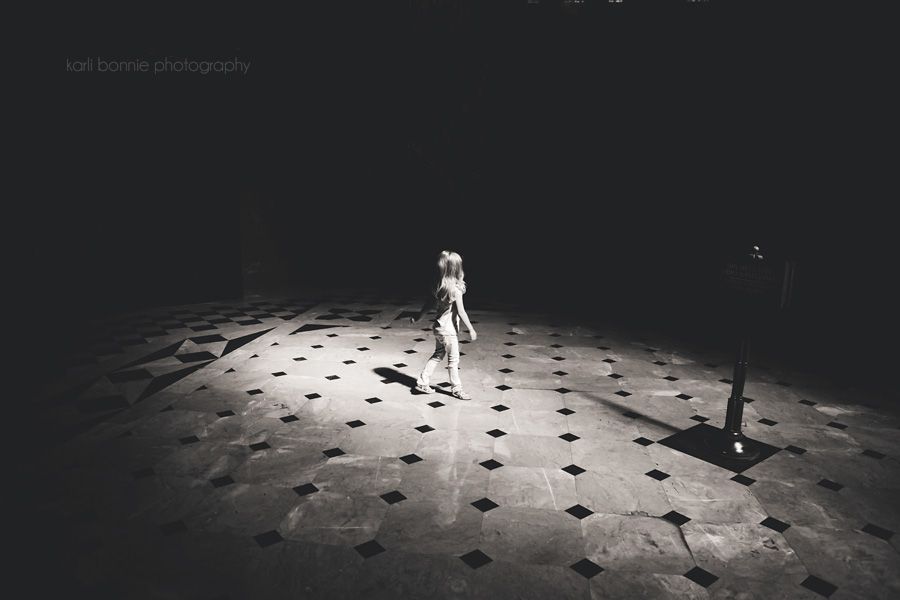
The "correct" way? Or MY way? ;-)
The correct way: spot meter (I've never had much luck with that; plus Canon cameras base spot metering off the center focus point. I rarely use the center focus point... I toggle my focus points. I don't know, spot metering just doesn't work for me).
My way: I usually stick to evaluative metering (if you don't know how to change the metering modes, your camera is probably already on evaluative - so you're all set!) I shoot in AV mode, and start by underexposing my image by 2 stops. If that is too dark, I move up to 1 2/3 stops underexposed or maybe 1 1/3. But that's the general range that works for me.
Here's another example of the same idea. Place your subject in a little patch of light. The rest of the photo will be in a darker or shaded area. (Real life example: sun streaking across your kitchen table, with most of the table being shaded). Underexpose your image and you will end up with something like this.

In the 2 photos above, I placed my subject (Livia, and then the oranges), in a little patch of light and then underexposed. In the picture of Collin below, he is not in a little patch of light; the lighting is even. In fact, it was totally bright outside, not at sunset as you might gather from the photo. It's just an example of how knowing how to use your camera's meter can get you any effect you want. (And the shot of Collin below is 2 stops underexposed, I believe).

8. You have had several posts, most recently the ones of your recent trip to Florida, with your kiddos on the beach. You always say that you dislike them because of the mid-day sun and harsh shadows... but they always look amazing to me. No blown out spots and wonderful even color. My mid-day photos certainly do not look like that. What do you do exposure wise or post production to make them look as good as they do?
OK first, this commenter deserves extra credit for flattery, and second, this question deserves an entire post (which I might just do). I even have a title all picked out. "Buildings don't squint." (Man, when genius strikes, it strikes, does it not?) ;-) Let me answer it in short: I keep the sun behind me, causing it to shine directly on my subject. WHAT??!! Harsh, midday sun shining directly on your subject? Isn't that wrong?? You be the judge with the following photos. They are all SOOC.
Keeping the sun at my back, here is an SOOC of our state capitol.

Next, I walked around the building and shot into the sun. It was probably 11:30 in these pictures where the sun was pretty straight overhead. To really convey my point, a much better time would have been when the sun was at more of an angle, like 3:00 or so... but nap time was looming. And you'll get the idea.
Ummm.... EWWWWWW????? Scroll back and forth between the photo above and the one below.

If you're thinking "well, you didn't expose the image right, it's underexposed," you're right. If you don't shoot in manual or use exposure compensation in AV or TV mode, that is what your photo will look like with your light meter set to zero. I knew that was not the correct exposure so I took the shot again, this time overexposing by one stop (in camera). Gross AGAIN! Where is my pretty blue sky?? There is nothing in processing that you can do to fix your blown out sky. I mean, you can add a fake one...but it's not the same effect. Again, if I did this at 3:00 or 4:00 where the sun was more obviously on one side of the building than the other, these examples would have even been even more dramatic. Check out the color of the grass in the 3rd example compared to the grass in the 1st example. Nice, healthy, dark green grass (in the 1st) compared to scary, florescent yellow grass (in the 3rd). All my settings were exactly the same. Where you are in relation to the sun... and where your subject is in relation to the sun makes a difference!

OK, so I think that covers many of the questions asked. Did it help you at all? Would you like me to go into more detail on that last question and find out what I mean by "Buildings Don't Squint"? LOL! If I get enough interest, I might do such a post. Can't let that clever title go to waste, right? If you have any questions about this post, don't hesitate to ask. I hope this post was helpful in some way! :-)
22 comments:
That was a fun read! :D
I got LR3 a couple of months ago... and it's all I use now. ;) No more PSE for me!
You should totally post about buildings and their lack of squintability. :D :D
ADORE that hazy b&w edit...fantastic!
Ekk! I am such a backlighter that I am one of those that gets that lime green grass. I guess I just can't give that up backlighting..Or I just need to learn the right way?? Great post!!
Karli you rock! Thanks so much for taking the time to do this. Yes I want to know why buildings don't squint.
In #7 I think you are saying you underexpose because the camera will want to brighten the photo up due to a majjority of the scene being darker? And you do this only when you have a little spot of light in the photo?
I've "studied" my actions too. It's a great way to learn.
Thank you again for sharing. This was super helpful.
Thank you for all of this imformation. I will have to come back and study it in more detail when I have a few more time. I am so happy to see that your wonderful photos are shot in jpeg!
Thank you for all of this imformation. I will have to come back and study it in more detail when I have a few more time. I am so happy to see that your wonderful photos are shot in jpeg!
Thank you so much, Karli! Wow, your generosity is amazing! I'd really like to know more about shooting in jpeg! Everything we've ever been taught says "RAW ONLY"! But you're bautiful photos just seem to knock that theory right out of the box for me! :)
I love that you did this Q & A!! Thank you! I will email you...so much to say, but not enough time right now. Might have to go back to shooting Av. And you use custom White Balance?...I used to do that and then talked to so many people who just said, "Oh, I just leave it on auto." So I switched back to auto. But my photos tend to have such a cool tone to them. Might have to switch back to custom.
And I SOOO wish that hazy action worked in Elements! ;)
Thanks for the great Q&A! I think it's interesting how everyone has a different approach and brings something unique to photography. Makes me think it's not so much about what's right or wrong, but about what works for each photographer and their own personal style.
Thanks for doing this Karli!!!! Now I know your "secrets" just kidding, but I have always wanted to know some of your tricks. Especially the hazy effect. I came up with the same way of doing it , the screen add ajustment layer fill of pinks and so on. But the levels way is faster and easier I did not know this way bt now I do. Also thanks for the B/W action tips.
I try to get it right in camera first. I used to use loads of actions but noew same as you I want them to look natural.
Well loves these tips and will use them when I can.
Happy weekend to you.
Great post, thanks for sharing all of this information. This is really useful!
Yes, please! Tell us more about the "Buildings Don't Squint." I definitely struggle with taking photos when the sun is super bright and sunny. Also, if you have time, can you tell us a bit more about #7 (metering)? I've been trying to do what you told me (via email and here) and they are just not coming out as beautiful as yours. Maybe share your settings?
Thank you so much for always sharing your wisdom!
LOVE this post Karli!!!! I shoot in jpg too. I figure it forces me to get it right in camera & not rely on processing to make the image. I know a lot of people like RAW but I did it for just a couple months & decided I really didn't want to have a gazillion external hard drives sitting around. :) I also used to use actions quite a bit & have tons of them. I have since moved to clean edits & maybe a light action if I feel like it- but I'm really liking the less is more lately.
I'm still working on the image in the dark & the tablet lighting- struggling with getting it sharp. However my second attempt was better than the first- so I will keep playing with it. :)
Hope you all are having a great weekend! Talk soon!
Love the second answer to my question. Yes definitely do the "Buildings don't squint" post! I can tell you that my photos probably would have ended up like building #3. Teach me! Have a wonderful Sunday!
THANK YOU! THANK YOU! THANK YOU!
I, too, am doing WAY less editing than I did when I first started this hobby. It used to take me 30 minutes just to edit one photo!! I wanted to do everything to it! :-)
Emmett is coming out this evening, so I'm going to try some of these techniques on the photos I'll surely take of him :-)
I think, though, that I need to take a photography class so my SOOC shots are better - even your SOOC is fantastic!
Love this post! You have such talent!
You are amazing!!!!! Thank you Thank you Thank you! I reiterate what everyone else says! You are so wonderful so generous to share all your knowledge with us!!!
THANK YOU!
Please, do tell, just HOW smart are you???? Seriously?!
XOXOXOXO
Lori
You're always so good about sharing your photo knowledge. I do love your hazy black and whites. They fit your style well.
All I can say is....Someone is a Rock Star. Her name begins with K....
Excellent. Love it. More please. (Like my daughter says when she is out of animal crackers. Minus the "please")
I went and googled all those actions - I am an action addict. Love them - until I saw the prices on some of them. Huummphhh! I did get the Free Summer haze and B&W Haze (same blog) - those are cool - already playing with them. So you just got lightroom? I love my lightroom - when I have a big batch, I export all my photos into there and quickly do a few fixes on lighting, etc... I love the coffeeshop presets for LR. ... and then export them out and if they need some more special tweaking, I pull the needy ones into PSE. So much time spent - but we all are crazy edit addicts! Actually I do all this while my husband is 'fantasy baseballing' LOL.
BUT that brings up a good question. HOW do YOU do your workflow & organization of files? From the time you pull your photos off your memory card to completed edit? I would love to know that in ROUND 2 of the Q&A! hehe ! :) OK enough of me. Have a good day!
Your photo's are so amazing hun and I have really enjoyed reading all your tips and information x x
You are awesome. I'll just get that out there.
We edit very much the same. Very minimal. And we even use a few of the same actions. Actually, I only use a handful, period. Vintage Spring being one of them :) And the Florabella Vignette and Center Fill Light...love those too. And I never spot meter even though I know I should.
You're awesome. Wait, did I already say that? :)
Post a Comment